> ## Documentation Index
> Fetch the complete documentation index at: https://unstructured-53-docs-243-plugins.mintlify.site/llms.txt
> Use this file to discover all available pages before exploring further.
# S3
If you're new to Unstructured, read this note first.
Before you can create a source connector, you must first [sign up for Unstructured](https://platform.unstructured.io).
After you sign up, the [Unstructured user interface](/ui/overview) (UI) appears, which you use to create the source connector.
After you create the source connector, add it along with a
[destination connector](/ui/destinations/overview) to a [workflow](/ui/workflows). Then run the worklow as a
[job](/ui/jobs). To learn how, try out the [hands-on UI quickstart](/ui/quickstart) or watch the 4-minute
[video tutorial](https://www.youtube.com/watch?v=Wn2FfHT6H-o).
You can also create source connectors with the Unstructured API.
[Learn how](/api-reference/workflow/sources/overview).
If you need help, reach out to the [community](https://short.unstructured.io/pzw05l7) on Slack, or
[contact us](https://unstructured.io/contact) directly.
You are now ready to start creating a source connector! Keep reading to learn how.
Ingest your files into Unstructured from Amazon S3.
The requirements are as follows.
The following video shows how to fulfill the minimum set of Amazon S3 requirements:
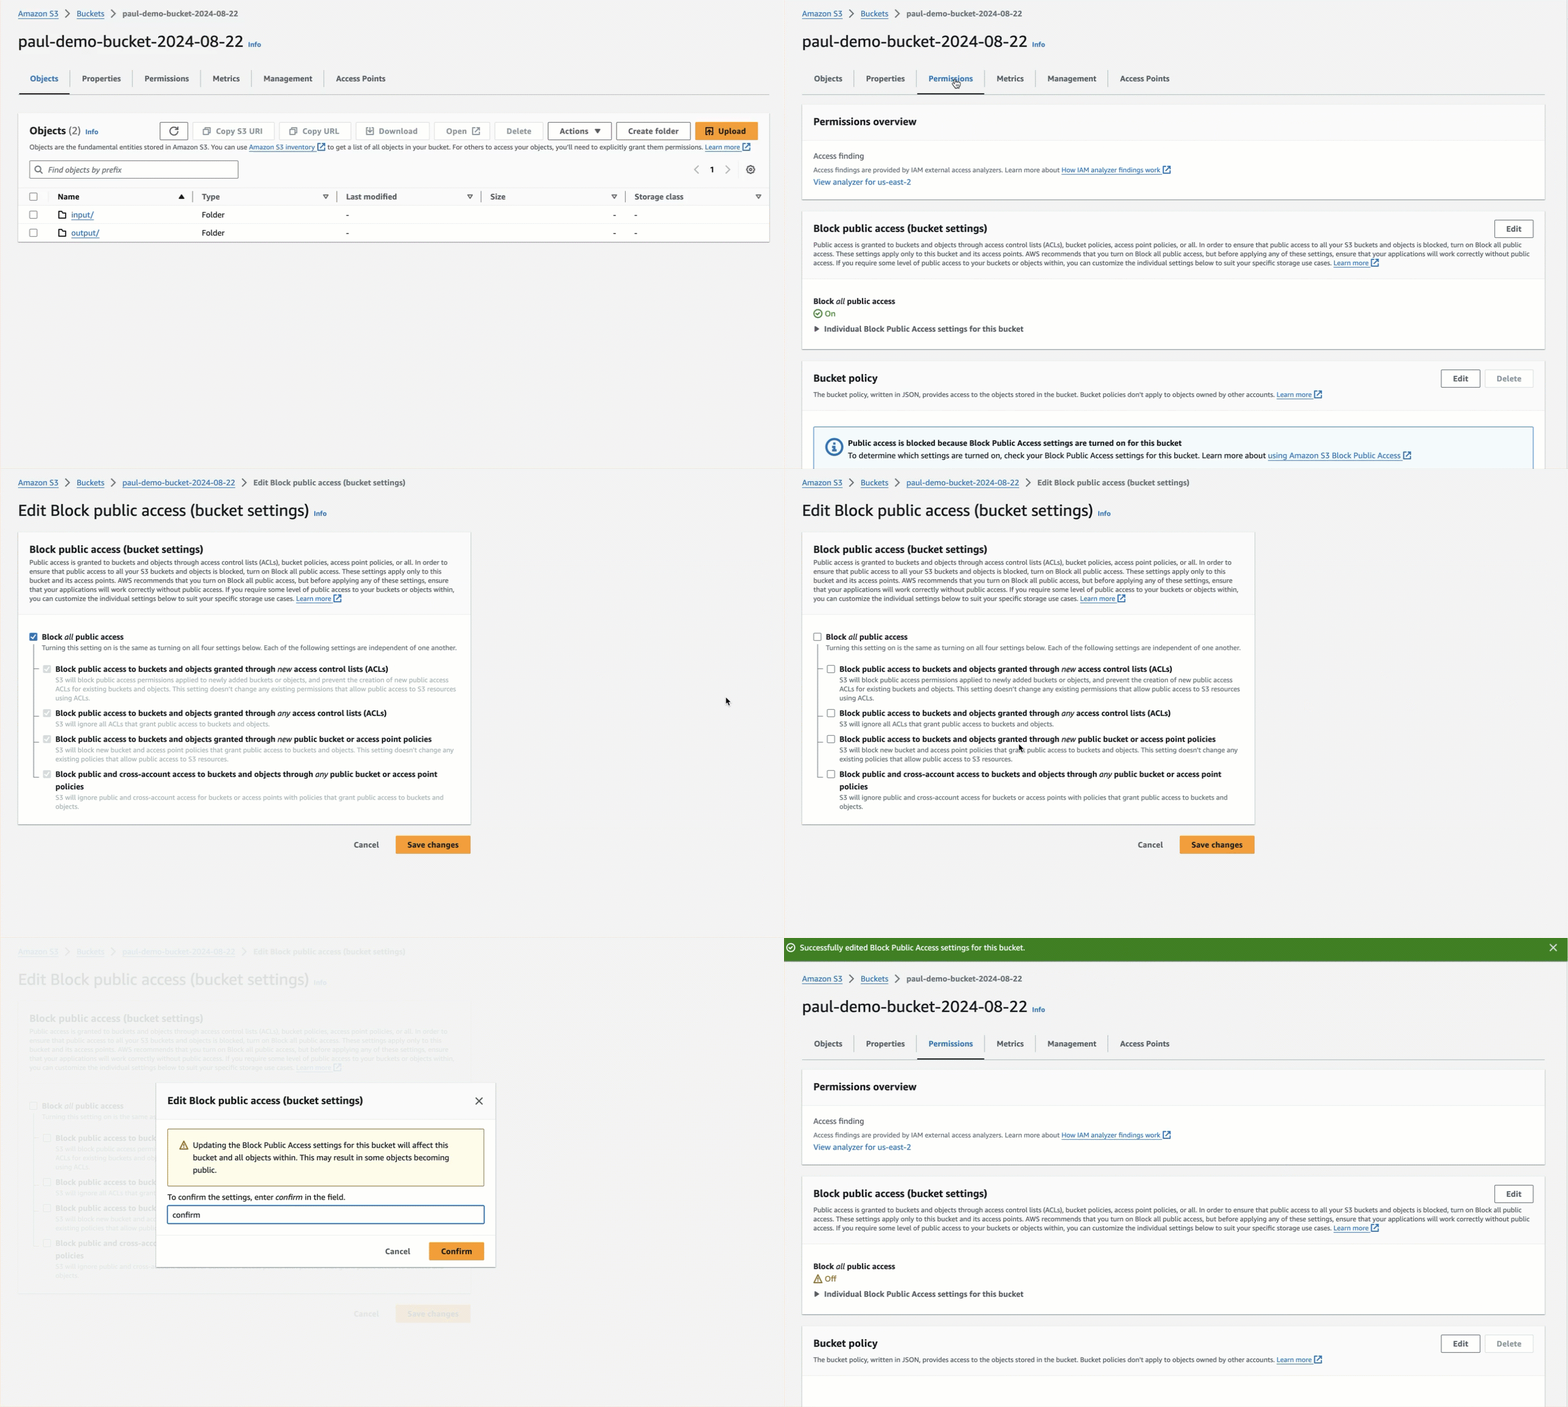
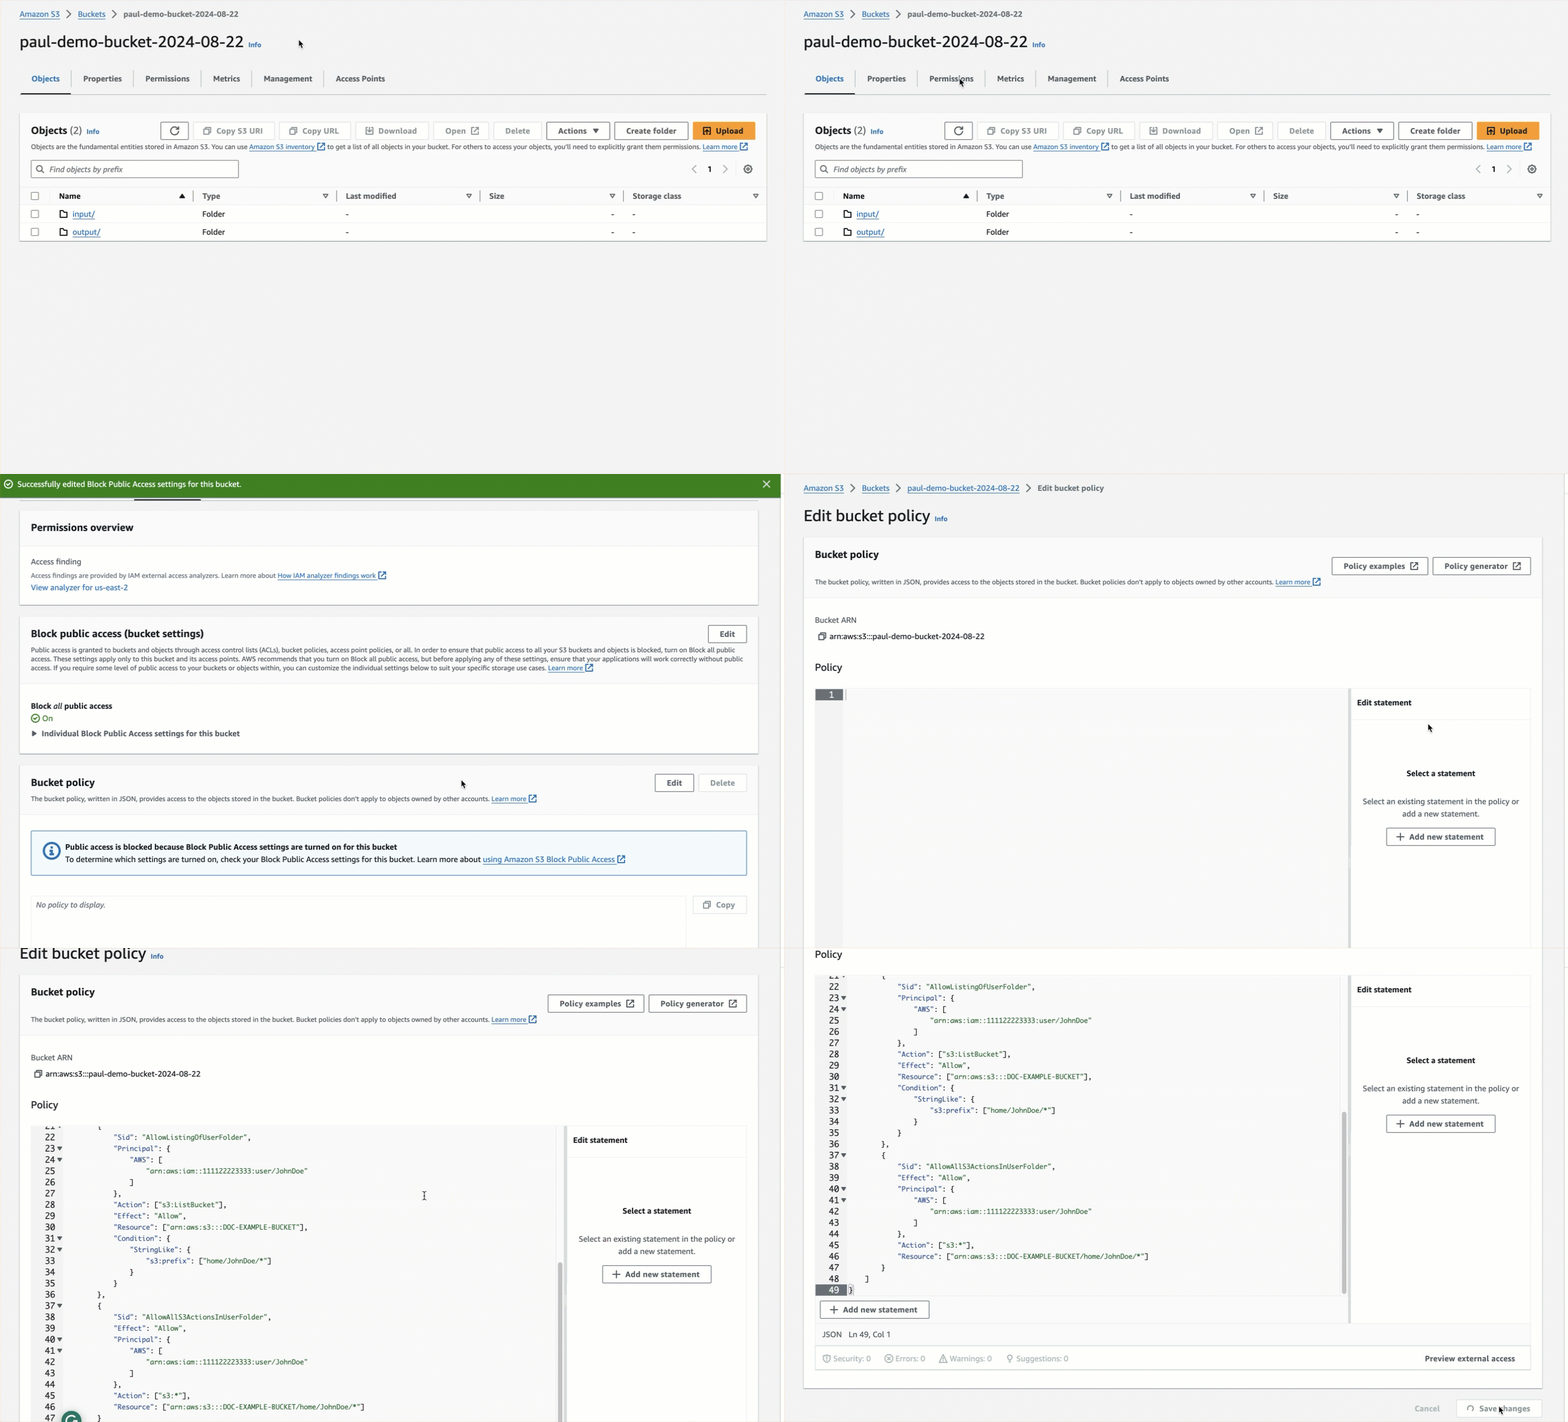
The preceding video does not show how to create an AWS account; enable anonymous access to the bucket (which is supported but
not recommended); or generate an AWS STS session token for temporary access, if required by your organization's security
requirements. For more information about requirements, see the following:
* An AWS account. [Create an AWS account](https://aws.amazon.com/free).
* An S3 bucket. [Create an S3 bucket](https://docs.aws.amazon.com/AmazonS3/latest/userguide/creating-bucket.html).
Additional approaches are in the following video and in the how-to sections at the end of this page.
* Anonymous (supported but not recommended) or authenticated access to the bucket.
* [Enable anonymous bucket access](https://docs.aws.amazon.com/AmazonS3/latest/userguide/example-bucket-policies.html#example-bucket-policies-anonymous-user).
* [Enable authenticated bucket access](https://docs.aws.amazon.com/AmazonS3/latest/userguide/walkthrough1.html).
* For authenticated bucket read access, the authenticated AWS IAM user must have at minimum the permissions of `s3:ListBucket` and `s3:GetObject` for that bucket. [Learn how](https://docs.aws.amazon.com/AmazonS3/latest/userguide/example-policies-s3.html).
* For bucket write access, authenticated access to the bucket must be enabled (anonymous access must not be enabled), and the authenticated AWS IAM user must have at
minimum the permission of `s3:PutObject` for that bucket. [Learn how](https://docs.aws.amazon.com/AmazonS3/latest/userguide/example-policies-s3.html).
* For authenticated access, an AWS access key and secret access key for the authenticated AWS IAM user in the account.
[Create an AWS access key and secret access key](https://docs.aws.amazon.com/IAM/latest/UserGuide/id_credentials_access-keys.html#Using_CreateAccessKey).
* For authenticated access in untrusted environments or enhanced security scenarios, an AWS STS session token for temporary access, in addition to an AWS access key and secret access key. [Create a session token](https://docs.aws.amazon.com/IAM/latest/UserGuide/id_credentials_temp_request.html#api_getsessiontoken).
* If the target files are in the root of the bucket, the path to the bucket, formatted as `protocol://bucket/` (for example, `s3://my-bucket/`).
If the target files are in a folder, the path to the target folder in the S3 bucket, formatted as `protocol://bucket/path/to/folder/` (for example, `s3://my-bucket/my-folder/`).
* If the target files are in a folder, and authenticated bucket access is enabled, make sure the authenticated AWS IAM user has
authenticated access to the folder as well. [Enable authenticated folder access](https://docs.aws.amazon.com/AmazonS3/latest/userguide/example-bucket-policies.html#example-bucket-policies-folders).
To create the source connector:
1. On the sidebar, click **Connectors**.
2. Click **Sources**.
3. Cick **New** or **Create Connector**.
4. Give the connector some unique **Name**.
5. In the **Provider** area, click **Amazon S3**.
6. Click **Continue**.
7. Follow the on-screen instructions to fill in the fields as described later on this page.
8. Click **Save and Test**.
Fill in the following fields:
* **Name** (*required*): A unique name for this connector.
* **Bucket URI** (*required*): The URI for the bucket or folder, formatted as `s3://my-bucket/` (if the files are in the bucket's root) or `s3://my-bucket/my-folder/`.
* **Recursive** (source connector only): Check this box to access subfolders within the bucket.
* **AWS Key**: For secret authentication, the AWS access key ID for the authenticated AWS IAM user.
* **AWS Secret Key**: For secret authentication, the AWS secret access key corresponding to the preceding AWS access key ID.
* **Token**: For token authentication, the AWS STS session token for temporary access.
* **Custom URL**: A custom URL, if connecting to a non-AWS S3 bucket.
## Add an access policy to an existing bucket
To use the Amazon S3 console to add an access policy that allows all authenticated AWS IAM users in the
corresponding AWS account to read and write to an existing S3 bucket, do the following.
Your organization might have stricter bucket policy requirements. Check with your AWS account
administrator if you are unsure.
1. Sign in to the [AWS Management Console](https://console.aws.amazon.com/).
2. Open the [Amazon S3 Console](https://console.aws.amazon.com/s3/home).
3. Browse to the existing bucket and open it.
4. Click the **Permissions** tab.
5. In the **Bucket policy** area, click **Edit**.
6. In the **Policy** text area, copy the following JSON-formatted policy.
To change the following policy to restrict it to a specific user in the AWS account, change `root` to that
specific username.
In this policy, replace the following:
* Replace `` with your AWS account ID.
* Replace `` in two places with the name of your bucket.
```json theme={null}
{
"Version": "2012-10-17",
"Statement": [
{
"Sid": "AllowAuthenticatedUsersInAccountReadWrite",
"Effect": "Allow",
"Principal": {
"AWS": "arn:aws:iam:::root"
},
"Action": [
"s3:GetObject",
"s3:PutObject",
"s3:ListBucket",
"s3:DeleteObject"
],
"Resource": [
"arn:aws:s3:::",
"arn:aws:s3:::/*"
],
"Condition": {
"StringEquals": {
"aws:PrincipalType": "IAMUser"
}
}
}
]
}
```
7. Click **Save changes**.
## Create a bucket with AWS CloudFormation
To use the AWS CloudFormation console to create an Amazon S3 bucket that allows all authenticated AWS IAM users
in the corresponding AWS account to read and write to the bucket, do the following.
Your organization might have stricter bucket policy requirements. Check with your AWS account
administrator if you are unsure.
1. Save the following YAML to a file on your local machine, for example `create-s3-bucket.yaml`. To change
the following bucket policy to restrict it to a specific user in the AWS account, change `root` to that
specific username.
```yaml theme={null}
AWSTemplateFormatVersion: '2010-09-09'
Description: 'CloudFormation template to create an S3 bucket with specific permissions for account users.'
Parameters:
BucketName:
Type: String
Description: 'Name of the S3 bucket to create'
Resources:
MyS3Bucket:
Type: 'AWS::S3::Bucket'
Properties:
BucketName: !Ref BucketName
PublicAccessBlockConfiguration:
BlockPublicAcls: true
BlockPublicPolicy: false
IgnorePublicAcls: true
RestrictPublicBuckets: true
BucketPolicy:
Type: 'AWS::S3::BucketPolicy'
Properties:
Bucket: !Ref MyS3Bucket
PolicyDocument:
Version: '2012-10-17'
Statement:
- Sid: AllowAllAuthenticatedUsersInAccount
Effect: Allow
Principal:
AWS: !Sub 'arn:aws:iam::${AWS::AccountId}:root'
Action:
- 's3:GetObject'
- 's3:PutObject'
- 's3:ListBucket'
- 's3:DeleteObject'
Resource:
- !Sub 'arn:aws:s3:::${BucketName}'
- !Sub 'arn:aws:s3:::${BucketName}/*'
Outputs:
BucketName:
Description: 'Name of the created S3 bucket'
Value: !Ref MyS3Bucket
```
2. Sign in to the [AWS Management Console](https://console.aws.amazon.com/).
3. Open the [AWS CloudFormation Console](https://console.aws.amazon.com/cloudformation/home).
4. Click **Create stack > With new resources (standard)**.
5. On the **Create stack** page, with **Choose an existing template** already selected, select **Upload a template file**.
6. Click **Choose file**, and browse to and select the YAML file from your local machine.
7. Click **Next**.
8. Enter a unique **Stack name** and **BucketName**.
9. Click **Next** two times.
10. Click **Submit**.
11. Wait until the **Status** changes to **CREATE\_COMPLETE**.
12. After the bucket is created, you can delete the YAML file, if you want.
## Create a bucket with the AWS CLI
To use the AWS CLI to create an Amazon S3 bucket that allows all authenticated AWS IAM users in the
corresponding AWS account to read and write to the bucket, do the following.
Your organization might have stricter bucket policy requirements. Check with your AWS account
administrator if you are unsure.
1. [Install the AWS CLI](https://docs.aws.amazon.com/cli/latest/userguide/getting-started-install.html).
2. [Set up the AWS CLI](https://docs.aws.amazon.com/cli/latest/userguide/getting-started-quickstart.html).
3. Copy the following script to a file on your local machine, for example a file named `create-s3-bucket.sh`.
To change the following bucket policy to restrict it to a specific user in the AWS account, change `root` to that
specific username.
In this script, replace the following:
* Replace `` with your AWS account ID.
* Replace `` with the name of your bucket.
* Replace `` with your AWS Region.
```bash theme={null}
#!/bin/bash
# Set variables for the AWS account ID, Amazon S3 bucket name, and AWS Region.
ACCOUNT_ID=""
BUCKET_NAME=""
REGION=""
# Temporary filename for the bucket policy.
# Do not change this variable.
POLICY_FILE="bucket_policy.json"
# Create the bucket.
aws s3api create-bucket --bucket $BUCKET_NAME --region $REGION
# Wait for the bucket to exist.
echo "Waiting for bucket '$BUCKET_NAME' to be fully created..."
aws s3api wait bucket-exists --bucket $BUCKET_NAME
# Check if the wait command was successful.
if [ $? -eq 0 ]; then
echo "The bucket '$BUCKET_NAME' has been fully created."
else
echo "Error: Timed out waiting for bucket '$BUCKET_NAME' to be created."
exit 1
fi
# Remove the "block public policy" bucket access setting.
aws s3api put-public-access-block \
--bucket $BUCKET_NAME \
--public-access-block-configuration \
'{"BlockPublicPolicy": false, "IgnorePublicAcls": false, "BlockPublicAcls": false, "RestrictPublicBuckets": false}'
# Check if the operation was successful.
if [ $? -eq 0 ]; then
echo "The block public policy access setting was removed from '$BUCKET_NAME'."
else
echo "Error: Failed to remove the block public policy access setting from '$BUCKET_NAME'."
exit 1
fi
# Create the bucket policy.
cat << EOF > $POLICY_FILE
{
"Version": "2012-10-17",
"Statement": [
{
"Sid": "AllowAuthenticatedUsersInAccountReadWrite",
"Effect": "Allow",
"Principal": {
"AWS": "arn:aws:iam::$ACCOUNT_ID:root"
},
"Action": [
"s3:GetObject",
"s3:PutObject",
"s3:ListBucket",
"s3:DeleteObject"
],
"Resource": [
"arn:aws:s3:::$BUCKET_NAME",
"arn:aws:s3:::$BUCKET_NAME/*"
],
"Condition": {
"StringEquals": {
"aws:PrincipalType": "IAMUser"
}
}
}
]
}
EOF
# Apply the bucket policy.
aws s3api put-bucket-policy --bucket $BUCKET_NAME --policy file://$POLICY_FILE
# Check if the policy application was successful.
if [ $? -eq 0 ]; then
echo "The bucket policy was applied to '$BUCKET_NAME'."
else
echo "Error: Failed to apply the bucket policy to '$BUCKET_NAME'."
exit 1
fi
# Verify the applied policy.
echo "Verifying the applied policy:"
aws s3api get-bucket-policy --bucket $BUCKET_NAME --query Policy --output text
# Remove the temporary bucket policy file.
rm $POLICY_FILE
```
4. Run the script, for example:
```bash theme={null}
sh create-s3-bucket.sh
```
5. After the bucket is created, you can delete the script file, if you want.
 * [Enable authenticated bucket access](https://docs.aws.amazon.com/AmazonS3/latest/userguide/walkthrough1.html).
 * For authenticated bucket read access, the authenticated AWS IAM user must have at minimum the permissions of `s3:ListBucket` and `s3:GetObject` for that bucket. [Learn how](https://docs.aws.amazon.com/AmazonS3/latest/userguide/example-policies-s3.html).
* For bucket write access, authenticated access to the bucket must be enabled (anonymous access must not be enabled), and the authenticated AWS IAM user must have at
minimum the permission of `s3:PutObject` for that bucket. [Learn how](https://docs.aws.amazon.com/AmazonS3/latest/userguide/example-policies-s3.html).
* For authenticated access, an AWS access key and secret access key for the authenticated AWS IAM user in the account.
[Create an AWS access key and secret access key](https://docs.aws.amazon.com/IAM/latest/UserGuide/id_credentials_access-keys.html#Using_CreateAccessKey).
* For authenticated access in untrusted environments or enhanced security scenarios, an AWS STS session token for temporary access, in addition to an AWS access key and secret access key. [Create a session token](https://docs.aws.amazon.com/IAM/latest/UserGuide/id_credentials_temp_request.html#api_getsessiontoken).
* If the target files are in the root of the bucket, the path to the bucket, formatted as `protocol://bucket/` (for example, `s3://my-bucket/`).
If the target files are in a folder, the path to the target folder in the S3 bucket, formatted as `protocol://bucket/path/to/folder/` (for example, `s3://my-bucket/my-folder/`).
* If the target files are in a folder, and authenticated bucket access is enabled, make sure the authenticated AWS IAM user has
authenticated access to the folder as well. [Enable authenticated folder access](https://docs.aws.amazon.com/AmazonS3/latest/userguide/example-bucket-policies.html#example-bucket-policies-folders).
To create the source connector:
1. On the sidebar, click **Connectors**.
2. Click **Sources**.
3. Cick **New** or **Create Connector**.
4. Give the connector some unique **Name**.
5. In the **Provider** area, click **Amazon S3**.
6. Click **Continue**.
7. Follow the on-screen instructions to fill in the fields as described later on this page.
8. Click **Save and Test**.
Fill in the following fields:
* **Name** (*required*): A unique name for this connector.
* **Bucket URI** (*required*): The URI for the bucket or folder, formatted as `s3://my-bucket/` (if the files are in the bucket's root) or `s3://my-bucket/my-folder/`.
* **Recursive** (source connector only): Check this box to access subfolders within the bucket.
* **AWS Key**: For secret authentication, the AWS access key ID for the authenticated AWS IAM user.
* **AWS Secret Key**: For secret authentication, the AWS secret access key corresponding to the preceding AWS access key ID.
* **Token**: For token authentication, the AWS STS session token for temporary access.
* **Custom URL**: A custom URL, if connecting to a non-AWS S3 bucket.
## Add an access policy to an existing bucket
To use the Amazon S3 console to add an access policy that allows all authenticated AWS IAM users in the
corresponding AWS account to read and write to an existing S3 bucket, do the following.
* For authenticated bucket read access, the authenticated AWS IAM user must have at minimum the permissions of `s3:ListBucket` and `s3:GetObject` for that bucket. [Learn how](https://docs.aws.amazon.com/AmazonS3/latest/userguide/example-policies-s3.html).
* For bucket write access, authenticated access to the bucket must be enabled (anonymous access must not be enabled), and the authenticated AWS IAM user must have at
minimum the permission of `s3:PutObject` for that bucket. [Learn how](https://docs.aws.amazon.com/AmazonS3/latest/userguide/example-policies-s3.html).
* For authenticated access, an AWS access key and secret access key for the authenticated AWS IAM user in the account.
[Create an AWS access key and secret access key](https://docs.aws.amazon.com/IAM/latest/UserGuide/id_credentials_access-keys.html#Using_CreateAccessKey).
* For authenticated access in untrusted environments or enhanced security scenarios, an AWS STS session token for temporary access, in addition to an AWS access key and secret access key. [Create a session token](https://docs.aws.amazon.com/IAM/latest/UserGuide/id_credentials_temp_request.html#api_getsessiontoken).
* If the target files are in the root of the bucket, the path to the bucket, formatted as `protocol://bucket/` (for example, `s3://my-bucket/`).
If the target files are in a folder, the path to the target folder in the S3 bucket, formatted as `protocol://bucket/path/to/folder/` (for example, `s3://my-bucket/my-folder/`).
* If the target files are in a folder, and authenticated bucket access is enabled, make sure the authenticated AWS IAM user has
authenticated access to the folder as well. [Enable authenticated folder access](https://docs.aws.amazon.com/AmazonS3/latest/userguide/example-bucket-policies.html#example-bucket-policies-folders).
To create the source connector:
1. On the sidebar, click **Connectors**.
2. Click **Sources**.
3. Cick **New** or **Create Connector**.
4. Give the connector some unique **Name**.
5. In the **Provider** area, click **Amazon S3**.
6. Click **Continue**.
7. Follow the on-screen instructions to fill in the fields as described later on this page.
8. Click **Save and Test**.
Fill in the following fields:
* **Name** (*required*): A unique name for this connector.
* **Bucket URI** (*required*): The URI for the bucket or folder, formatted as `s3://my-bucket/` (if the files are in the bucket's root) or `s3://my-bucket/my-folder/`.
* **Recursive** (source connector only): Check this box to access subfolders within the bucket.
* **AWS Key**: For secret authentication, the AWS access key ID for the authenticated AWS IAM user.
* **AWS Secret Key**: For secret authentication, the AWS secret access key corresponding to the preceding AWS access key ID.
* **Token**: For token authentication, the AWS STS session token for temporary access.
* **Custom URL**: A custom URL, if connecting to a non-AWS S3 bucket.
## Add an access policy to an existing bucket
To use the Amazon S3 console to add an access policy that allows all authenticated AWS IAM users in the
corresponding AWS account to read and write to an existing S3 bucket, do the following.